Friday, January 30, 2009

Featured On Etsy

So exciting to have my first feature on Etsy.com!! (Which means that I made it to their front page on their site.) I am the top left pair of earrings:


Thursday, January 15, 2009

Banner Work for Etsy

After Christmas, I decided that I wanted to "spruce" my Etsy banner up. I chose WildMagic Design Studio and I am so please with her work. She came up with something so quickly and beautiful that I knew that I did not make a mistake when choosing her shop. She listens so well and kept working on the banner until I was comletely happy. And being a wanna-be graphic designer (persued graphic design in college), I was picky and asked her to change my design a handful of times.

I love what she did with my banner and I wanted to show it off to you. And I hope that you go to her if you are in search of a new banner. You won't be disappointed!

Monday, January 12, 2009

Organizing my Studio


As I have been building up my jewelry business I am noticing the great need to have my studio which includes jewelry supplies (silver, copper, beads and findings) and shipping supplies (more than I thought I would need) all in order.

Since I also have a Professional Organizing business going for the last 5 years you would think that my studio would be in perfect order. Nope! And it drives me crazy! My birthday is the middle of February and all I ask for (from my husband) is that I can make it look so pleasing to the eye that I would want to be in there. creating I am not quite sure how that will look but I know once I start it will hopefully evolve into an inspiration area.

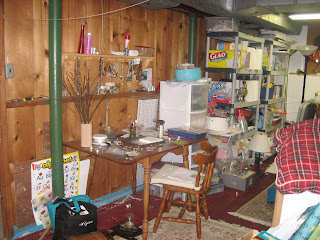
I started today by organizing the whole un-finished side of our basement by getting rid of things that I have not used in a very long time, if ever. I just want to say that the bigger the storage space that you have the more stuff you will accumulate. In which I have!

So, the first step was to sort out the stuff, Keep, Trash & Give away/sell. There were so many items that I need to get rid of. I have at least a 4ftx6ft space of give aways.

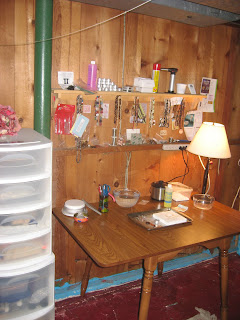
The next step was clearing of my jewelry desk and clean it off. I solder , pickle, buf and drill all of silver and copper on this side of the basement. Just doing that made the biggest difference in the world. Now when I go to work I will feel more inspired. Seeing bits and pieces of old string and wire and single beads bursts my creativity. I didn't have a light at my workspace (no outlet) so I ran an extension cord around and plugged in my light and my pickle. Just writing about it gets my in the mood to make jewelry. I can't wait for some free time to solder something special.

I included some picture of how my progress went today. I will have more pictures as I beautify this area..

Thanks for reading!


BEFORE

BEFORE

Before

After

My end goal is to have this not only organized but pretty & fun by adding colored paint, and fabric hanging from the ceiling to the floor to section off the rest of the ugly basement. Until then, I am incredibly thankfully for having the space already have.

(Click on the pictures if you want to see it in more detail.)

Friday, January 9, 2009

Gift Box Template

I have been researching and trying out different templates to make a little gift box to send out with my jewelry. I found a couple and made them with my card stock paper to see what would look beautiful and hold up with shipping to my customers. And this is the one that I found and really love:
Flap Box

If you are looking for something different to try here are some more:
Other templates

Thursday, January 8, 2009

Dabbling with Copper Sheet

I just figured out how to work with the copper sheet that I bought many months ago. I found out that the gauge of the sheet makes a big difference in the tools that you need. I should have known that but didn't realize what that really meant until I got the 20 gauge sheet home. I need some type of saw to cut it! Yikes! I am not ready for that! So, I went to my local bead store and got a larger gauge, 30 gauge. That is very easy to cut and only needed sheet "scissors". Side Note: I have access the best jewelry supply/bead store in Maryland. It is only 1 mile away. (Great or Dangerous, depends on who you ask in my house :-)). If you live in Maryland try to get there. It is called Terra Firma Enterprises. And their sister store is called Baltimore Beads.

Anyway, here is my latest creation:


Wednesday, January 7, 2009

My New Light Box


This was fun! And so helpful especially on cold or rainy days. I used to take my pictures outside in the natural light but once fall came and I had to wear a jacket and my pictures were coming out fuzzy because I was shaking...it was time to make a light box that I could use in my house.

I used 3 large pieces of foam core board
(cut them to make this kind of shape.)
1-bottom
2-cut into three pieces to make sides (use super sharp-hide them from your kids sharp-box cutters)
3-on top-for some reason this helps by closing in the light so it does not spread away from the area.
2 lamps that are clip-able.
Bought two different ones . The one of the left is a really good one. It is an 8 inch reflector light that you find at Home Depot. It spreads the light evenly. The one on the right works but is not as good. I had to buy a light bulb that had reflector to direct the light where I wanted it. The
2 Light Bulbs
I really like the natural-white light bulbs. Look at the lamps that you buy to gauge the watts. There are a couple of brands. Check with a Home Depot associate. They are usually informative.
Tape
Don't use duct tape (it gets icky sticky with the lights on)
Use white masking tape for a clean look
Props
I make jewelry so different kinds of props are good depending on the color and the style of your jewelry that you are photographing.

Side Notes:
Your pictures turn out so much better when you take them during the day near a window.

LinkWithin

Related Posts Plugin for WordPress, Blogger...